

Would you like to groom your dog at home? We have some helpful tips to help you to confidently groom your dog with clippers!
Many hypoallergenic dogs are non-shedding dogs, with hair that grows constantly. They require consistent grooming to keep their coats healthy! Not all dogs are as comfortable at the groomer’s as we are at the salon and we want you to feel confident knowing how to groom your dog at home!
(Please note: Grooming equipment can be dangerous and should be used with professional instruction and lots of care).
Dog Grooming items you will most likely need to get started:
- Clippers
- Blades (including a ten blade)
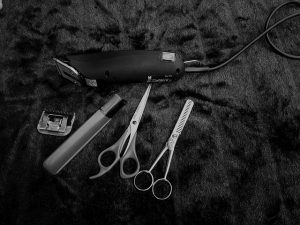
- Clip combs
- Stainless steel comb
- Slicker brush
- Nail trimmers
- Nail grinder
- Short shears
- Thinning shears
- Blade coolant
- “Quick stop”
Safety:
Be sure to check the blade heat on your arm every few minutes to make sure the blade isn’t too hot. If it is, use some coolant which can be purchased at most pet stores that sells grooming supplies. You also want to take note to always hold any extra skin taught and to never shave the blade in alignment with any loose skin.
Step 1 – Wash Your Dog
Before you begin cutting your dog’s hair with the clippers, you will want to ensure their coat is in the proper condition. Clean hair that is fully dried will give you the best results.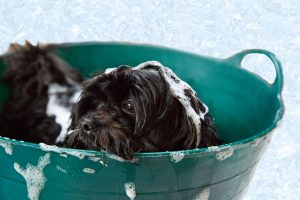
Prepare their coat for washing: Give your dog a good brush before wetting their coat. If your dog is already significantly matted, which can easily happen in hypoallergenic breeds, you will want to do a pre-shave. A pre-shave is just what it sounds like – you shave the dog or trim out the mats before the bath, wash the dog, dry it, and shave again.
Then bathe, shampoo, and dry your dog.
Step 2 – Brush Your Dog
Brush your dog’s coat as thoroughly as you can, to ensure the coat is easier to run the clippers through. Brush in the direction the hair is growing. This preparation will make the clipping process easier, as you will mostly have a clean, smooth coat to work with.
Step 3 – Getting started: 10 blade work – Paws, butts and armpits!
 With the purchase of your new clippers, hopefully you acquired a ten blade. Once you have secured the ten blade onto your clippers, you can start by shaving out the paw pads and doing a sanitary trim.
The paw pads are on the underside of your dog’s foot, and often hair grows in between them. Dogs can have webbed skin so take note to not dig with the blade or go in between the toes from the front of the paw. Making sure the foot is bending in a natural position, firmly hold the paw in your hand. Begin running the blade over any excess fur until the desired length is reached on all four paws.
You can now move onto the sanitary trim. This trim occurs where your dog goes “potty”. You can lift each side of the leg, holding any extra skin taught, and shaving the hair away from the inside of the legs and across the belly. Take note to be careful around the nipples, especially with smaller dogs. If your dog is a female, you will shave inward on both sides of where she urinates. If you have a male dog, you can shave from the base of the scrotum to the front, being careful to not catch any skin. When you go to shave hair from around the butt, shave away from the center. Shaving down at the bottom, up at the top and away from the center on both sides. Never cross the actual anus itself.
You will also want to shave your dog’s armpits with a ten blade. Holding the dog’s leg to the side in a natural position shave away any excess fur with a light hand and a scooping motion.
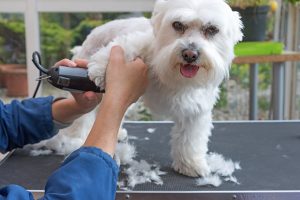
Step 3 – Clipping Your Dog’s Body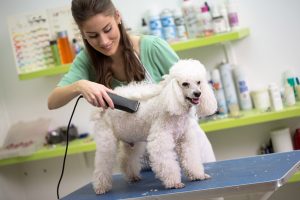
Shaving the body can be a lot of fun! Start with your blade or clip comb at the base of the dog’s head, pulling any extra skin taught, and going straight down the back. As you work your way to the sides of the dog, you want to follow the curve of your dog’s body on an angle. For example, you wouldn’t go down the shoulder straight, but at a slight angle following the top of the shoulder almost to the dog’s armpit. Follow this motion as you groom the dogs whole body. Have a light hand and let the clippers do the work.
Once you have shaved the body, you can shave the legs going downward. Take note that if you shave against the fur and don’t follow the pattern in which it grows, it will be cut shorter by the blade. It is important to follow the pattern of the fur with how it grows on your pet.
Back brushing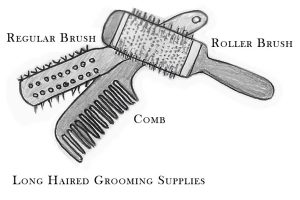
As you shave or use a clip comb on your dog, you will most likely have to back brush. This means that you will brush the fur backwards from how it naturally grows. Then you will run the blade back down across the hair you just brushed. This ensures for a polished looking groom and that you are cutting all the fur evenly as you go. You will look like a pro!
Step 4 – Trimming the Face
Now let’s talk about how to groom a dog’s face with clippers.
Since you have a hypoallergenic dog, you will probably choose one of two looks for the face. Some people like their dog to have a clean face like a poodle, or some like a doodle face that is short and round! No matter what face style you choose, take note of the ears and where they are at, always. This will ensure keeping your pet safe and happy!
First, we are going to discuss a “short round face” for your dog! Depending on the length you picked for your dog’s body, pick two clip combs longer than that length for the face. Run the clip comb over the sides of the face and top of the head, taking note to not catch the ears or run over the eyes. You will also want to make sure you always shave downward, as to not catch your dog’s loose lip skin.
Once you have knocked off most of the extra fur to the desired length, you can now back brush and run the clippers over the face again. After this, you can brush upwards again, looking for any hairs that “stick out”. When you see some, you can gently use your scissors or thinning shears if you have them, to cut away any stray hairs.
When trimming your dog’s face you might find it more comfortable to use a chin hold. This is where you hold the fur firmly that is attached right under your dog’s chin. It may seem funny to hold your dog’s fur like they have a little goat beard, but it also allows you to keep your pet’s face from moving suddenly. Back brushing the face polishes the groom and ensures that the face is even. You can then take your same thinning shears and even out the base of the head where you had first started shaving your dog’s body. This is called blending and makes a less harsh line to the naked eye.
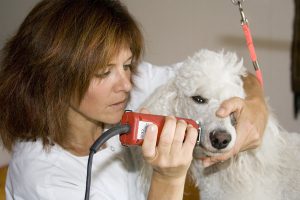 If you wish to give your dog a “clean face”, you will want to get your ten blade back out. Always shave downward and not directly in alignment with any loose skin, especially around the lips. Be very careful around the eyes as they have sensitive, thin skin. Pull any loose skin taught and begin shaving with a light hand. You will shave below the jaw, above the nose, the sides of the face, and the entire jaw line. Your dogs face will look bare, which is why it’s called a clean face. This is a great option for hypoallergenic dogs who love to splash in the water or get their food stuck in their beard.
Step 5 – Trimming the tail
If your dog has a short, docked tail you will most likely shave the base of the tail and leave some longer fur on the end that you can brush and then shape to look like a little puff. This is known as a “pom pom”. To get a “pom pom” even, you will brush a lot and then take off a little at a time until you have an even little “ball”.
If your dog has a longer tail, like a Maltese, you will brush the fur, hold the tail out straight and start trimming the fur at the desired length. Brush downward and continue to trim until all the fur is at the same, even length.
While you are polishing the groom, you can check for any spots of hairs that “don’t belong” on your dog’s body and even them out with your shears. Back brushing earlier while you shaved the body will help cut down on this step. Always be sure to know where the tip of your shears are to ensure the best safety for your pet.
Step 6 – How to Trim Your Dog’s Nails
When you go to trim your dog’s nails with nail clippers, you want to do a little at a time and look for a small dot that will signify the living part of the nail. That dot is called a quick, and it is the part of the nail that if cut too short will begin to bleed and can cause your dog some pain.
As you trim little by little you will eventually see that dot, and once you do that’s your cue to stop trimming. When the quick is exposed to oxygen, it begins to recede. Over time, as the quick shortens, this will allow you to trim your dog’s nails shorter and shorter. If you are looking to get your dog’s nails smoother and find a closer trim to the quick, you can also use a dog nail grinder. With many dogs it is still best to cut a majority of the nail off, before reaching the quick, and then begin grinding. This is a smoother process for your pet and will ensure getting the nail as short as possible.
If you do accidentally go a little too short on you dog’s nail, there is a powder you can buy, also known as Quick Stop, that will help stop the bleeding quickly. Please note that this powder is only to be used on your pet’s nails, never their body. If your pooch does experience any kind of cut while grooming it is best to take them to a vet.
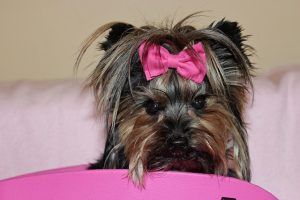
Step 7 – Put a bow on it!
Your hypoallergenic dog is now clean, groomed, and looking amazing! Keep practicing your skills, stay patient with your pet and have fun!
As you practice and become confident with these amazing tips on How to Groom a Dog With Clippers at Home, your dog will look like a star in no time! Have fun!
